 awesome-hacks
NestJS + Swagger
Swagger UIを有効化し、DTOにApiPropertyを付けてリクエスト/レスポンス仕様をドキュメント化する
NestJS Guard / JWT認証まで終えている前提。
この記事では、これまで作ったAPIをSwagger UIから確認できるようにする。
この記事でやること
main.tsにSwagger UIを追加する- DTOに
@ApiPropertyを付け、リクエストBodyの形を見える化する - Controllerに
@ApiTags/@ApiBearerAuthを付け、APIを整理する - Swagger UIの Authorize からJWTを入れて認証必須APIを試す
触るファイル一覧
api-sample/
└─ src/
   ├─ main.ts
   ├─ auth/
   │  ├─ auth.controller.ts
   │  └─ dto/
   │     └─ login.dto.ts
   └─ users/
      ├─ dto/
      │  ├─ create-user.dto.ts
      │  └─ update-user.dto.ts
      └─ users.controller.ts
1. パッケージを追加する
pnpmの場合。
pnpm add @nestjs/swaggernpmの場合。
npm install @nestjs/swagger2. main.ts にSwagger UIを追加する
編集するファイルは api-sample/src/main.ts。
ValidationPipe や GlobalExceptionFilter はそのまま残し、Swagger用のimportと設定を追加する。
import { ValidationPipe } from "@nestjs/common";
import { NestFactory } from "@nestjs/core";
import { DocumentBuilder, SwaggerModule } from "@nestjs/swagger"; // 追加
import { AppModule } from "./app.module";
import { GlobalExceptionFilter } from "./common/filters/http-exception.filter";

async function bootstrap() {
  const app = await NestFactory.create(AppModule);

  app.useGlobalPipes(
    new ValidationPipe({
      whitelist: true,
      forbidNonWhitelisted: true,
      transform: true,
    }),
  );

  app.useGlobalFilters(new GlobalExceptionFilter());

  // 追加: Swaggerの基本情報とBearer認証を設定する
  const config = new DocumentBuilder()
    .setTitle("nestjs-practice-api")
    .setDescription("User management API")
    .setVersion("1.0")
    .addBearerAuth()
    .build();

  // 追加: /api でSwagger UIを開けるようにする
  const document = SwaggerModule.createDocument(app, config);
  SwaggerModule.setup("api", app, document);

  await app.listen(process.env.PORT ?? 3000);
}
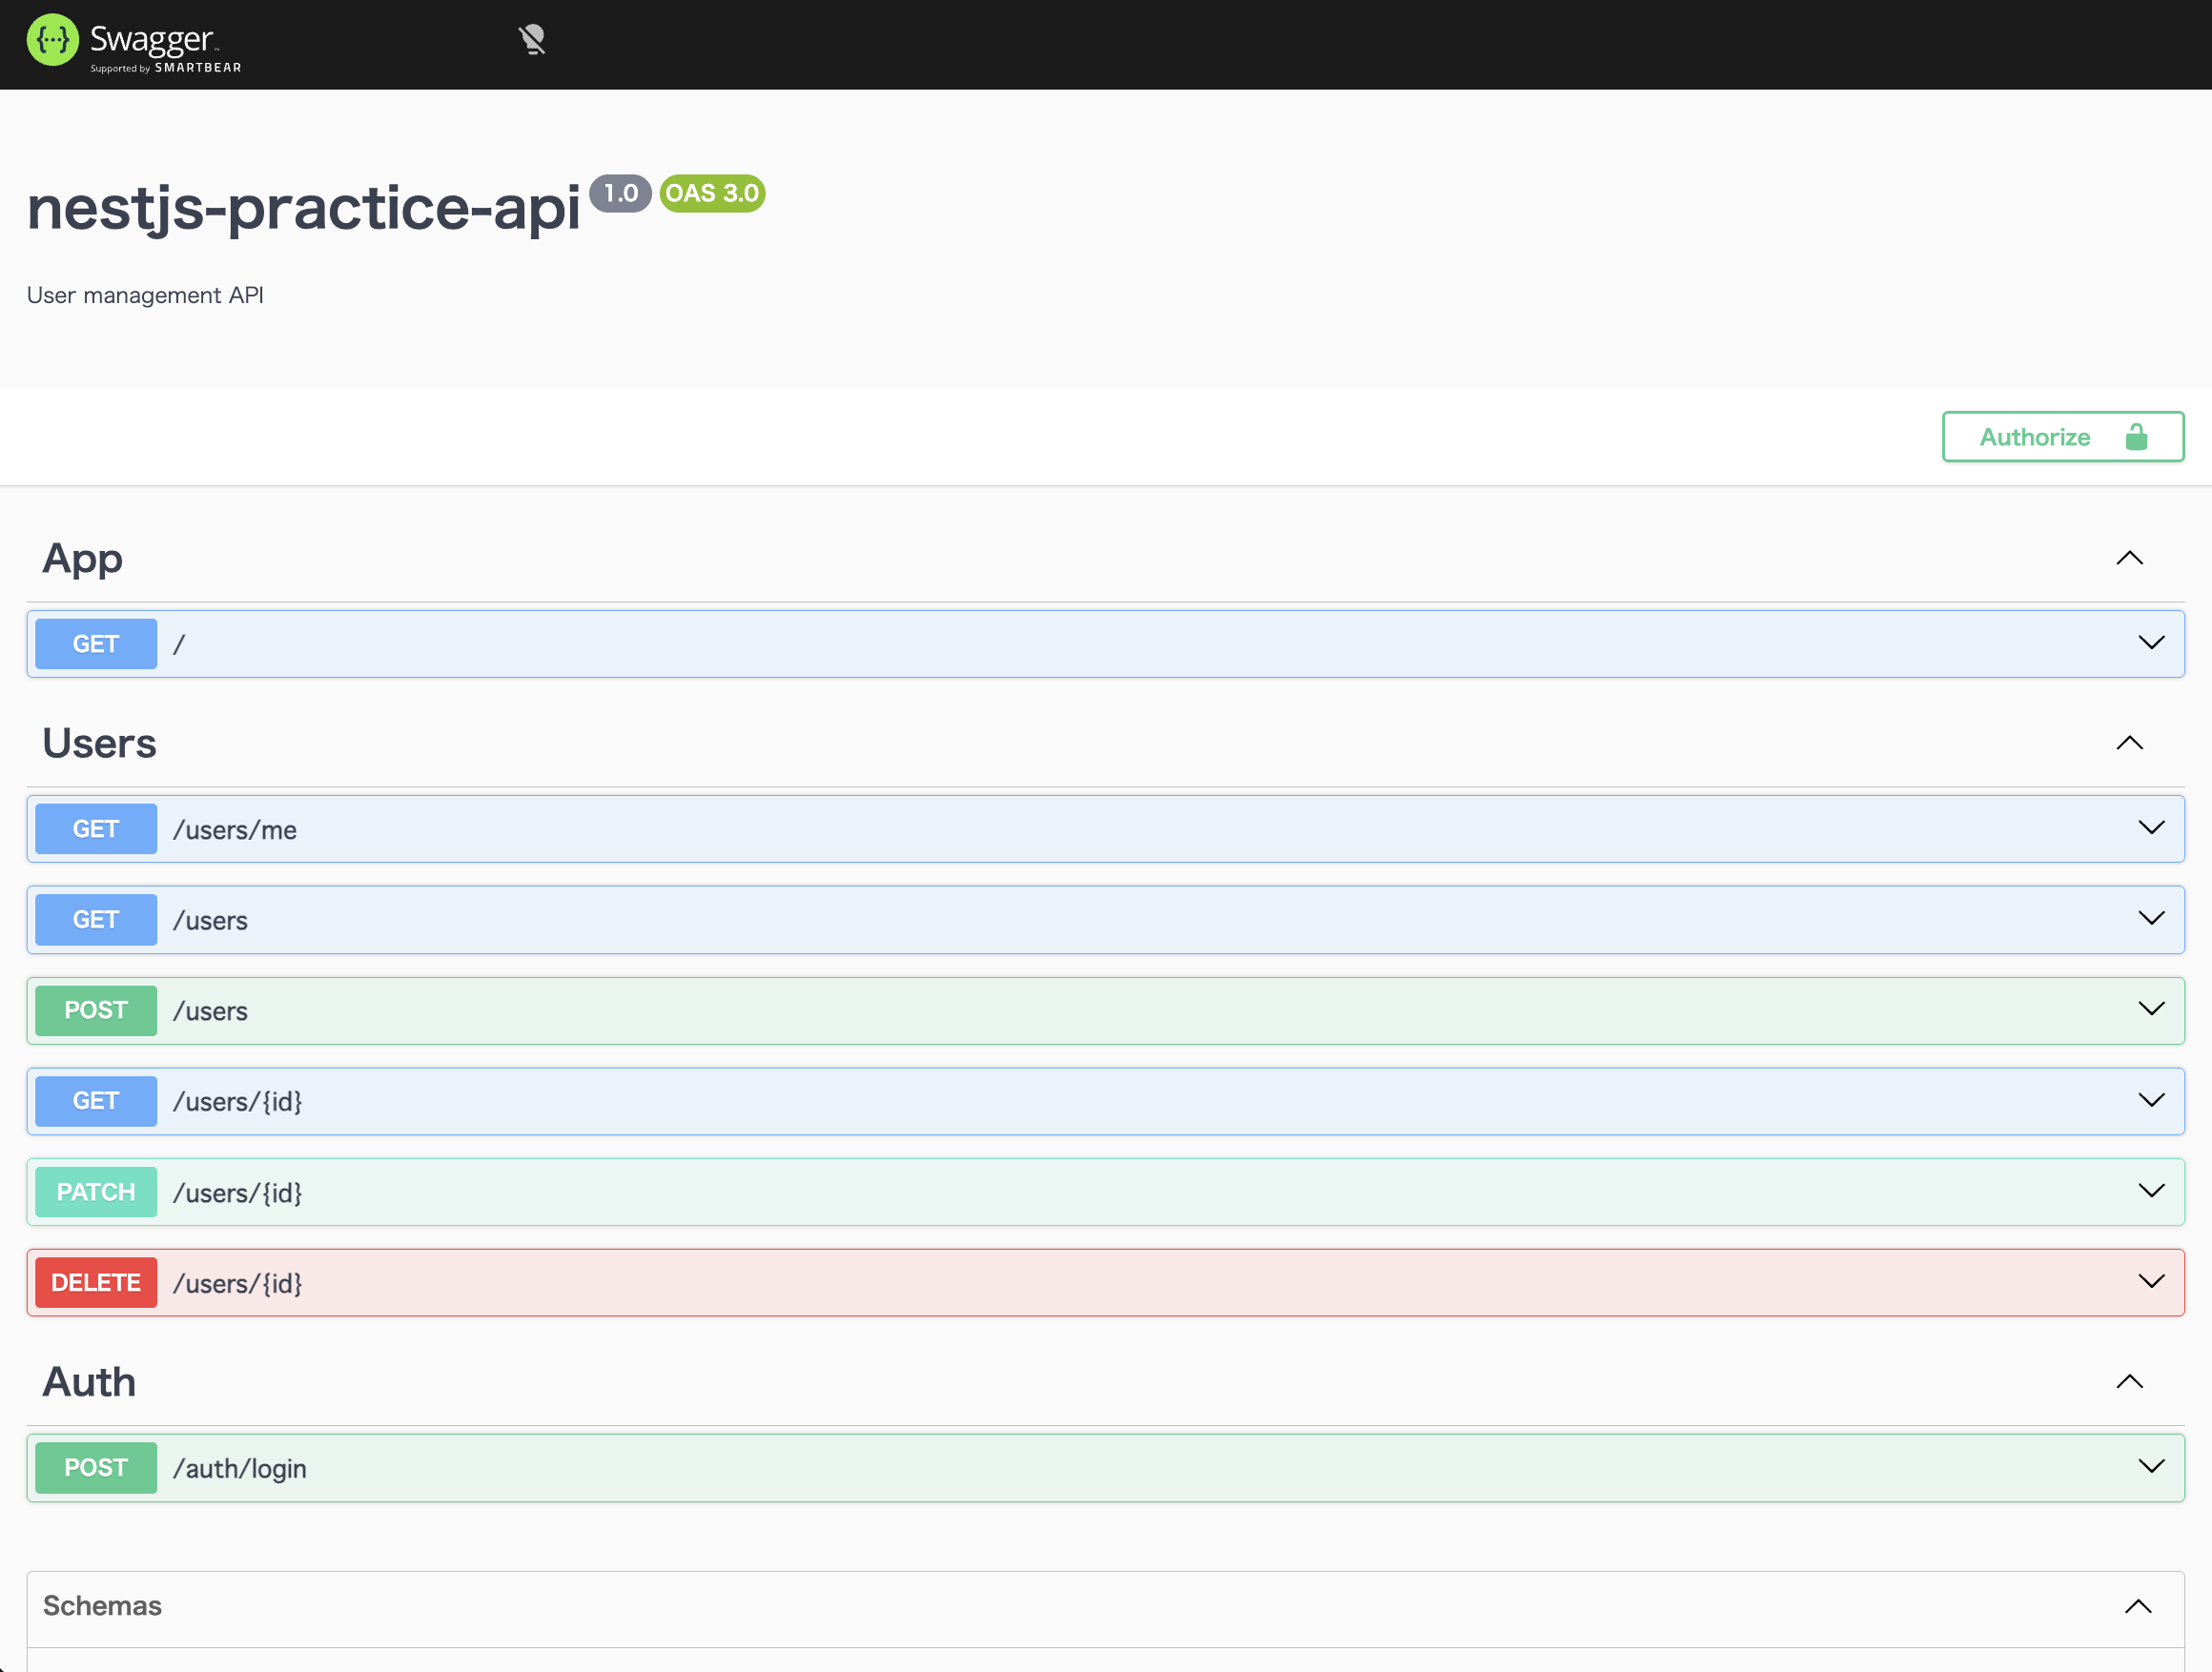
bootstrap();起動後、http://localhost:3000/api にアクセスするとSwagger UIが表示される。
3. CreateUserDto にSwagger用の説明を追加する
編集するファイルは api-sample/src/users/dto/create-user.dto.ts。
import { ApiProperty } from "@nestjs/swagger"; // 追加
import { IsEmail, IsString, Length } from "class-validator";

export class CreateUserDto {
  @ApiProperty({ example: "taro@example.com" }) // 追加
  @IsEmail()
  email!: string;

  @ApiProperty({ example: "Taro", minLength: 1, maxLength: 50 }) // 追加
  @IsString()
  @Length(1, 50)
  name!: string;

  @ApiProperty({ example: "password123", minLength: 8, maxLength: 72 }) // 追加
  @IsString()
  @Length(8, 72)
  password!: string;
}
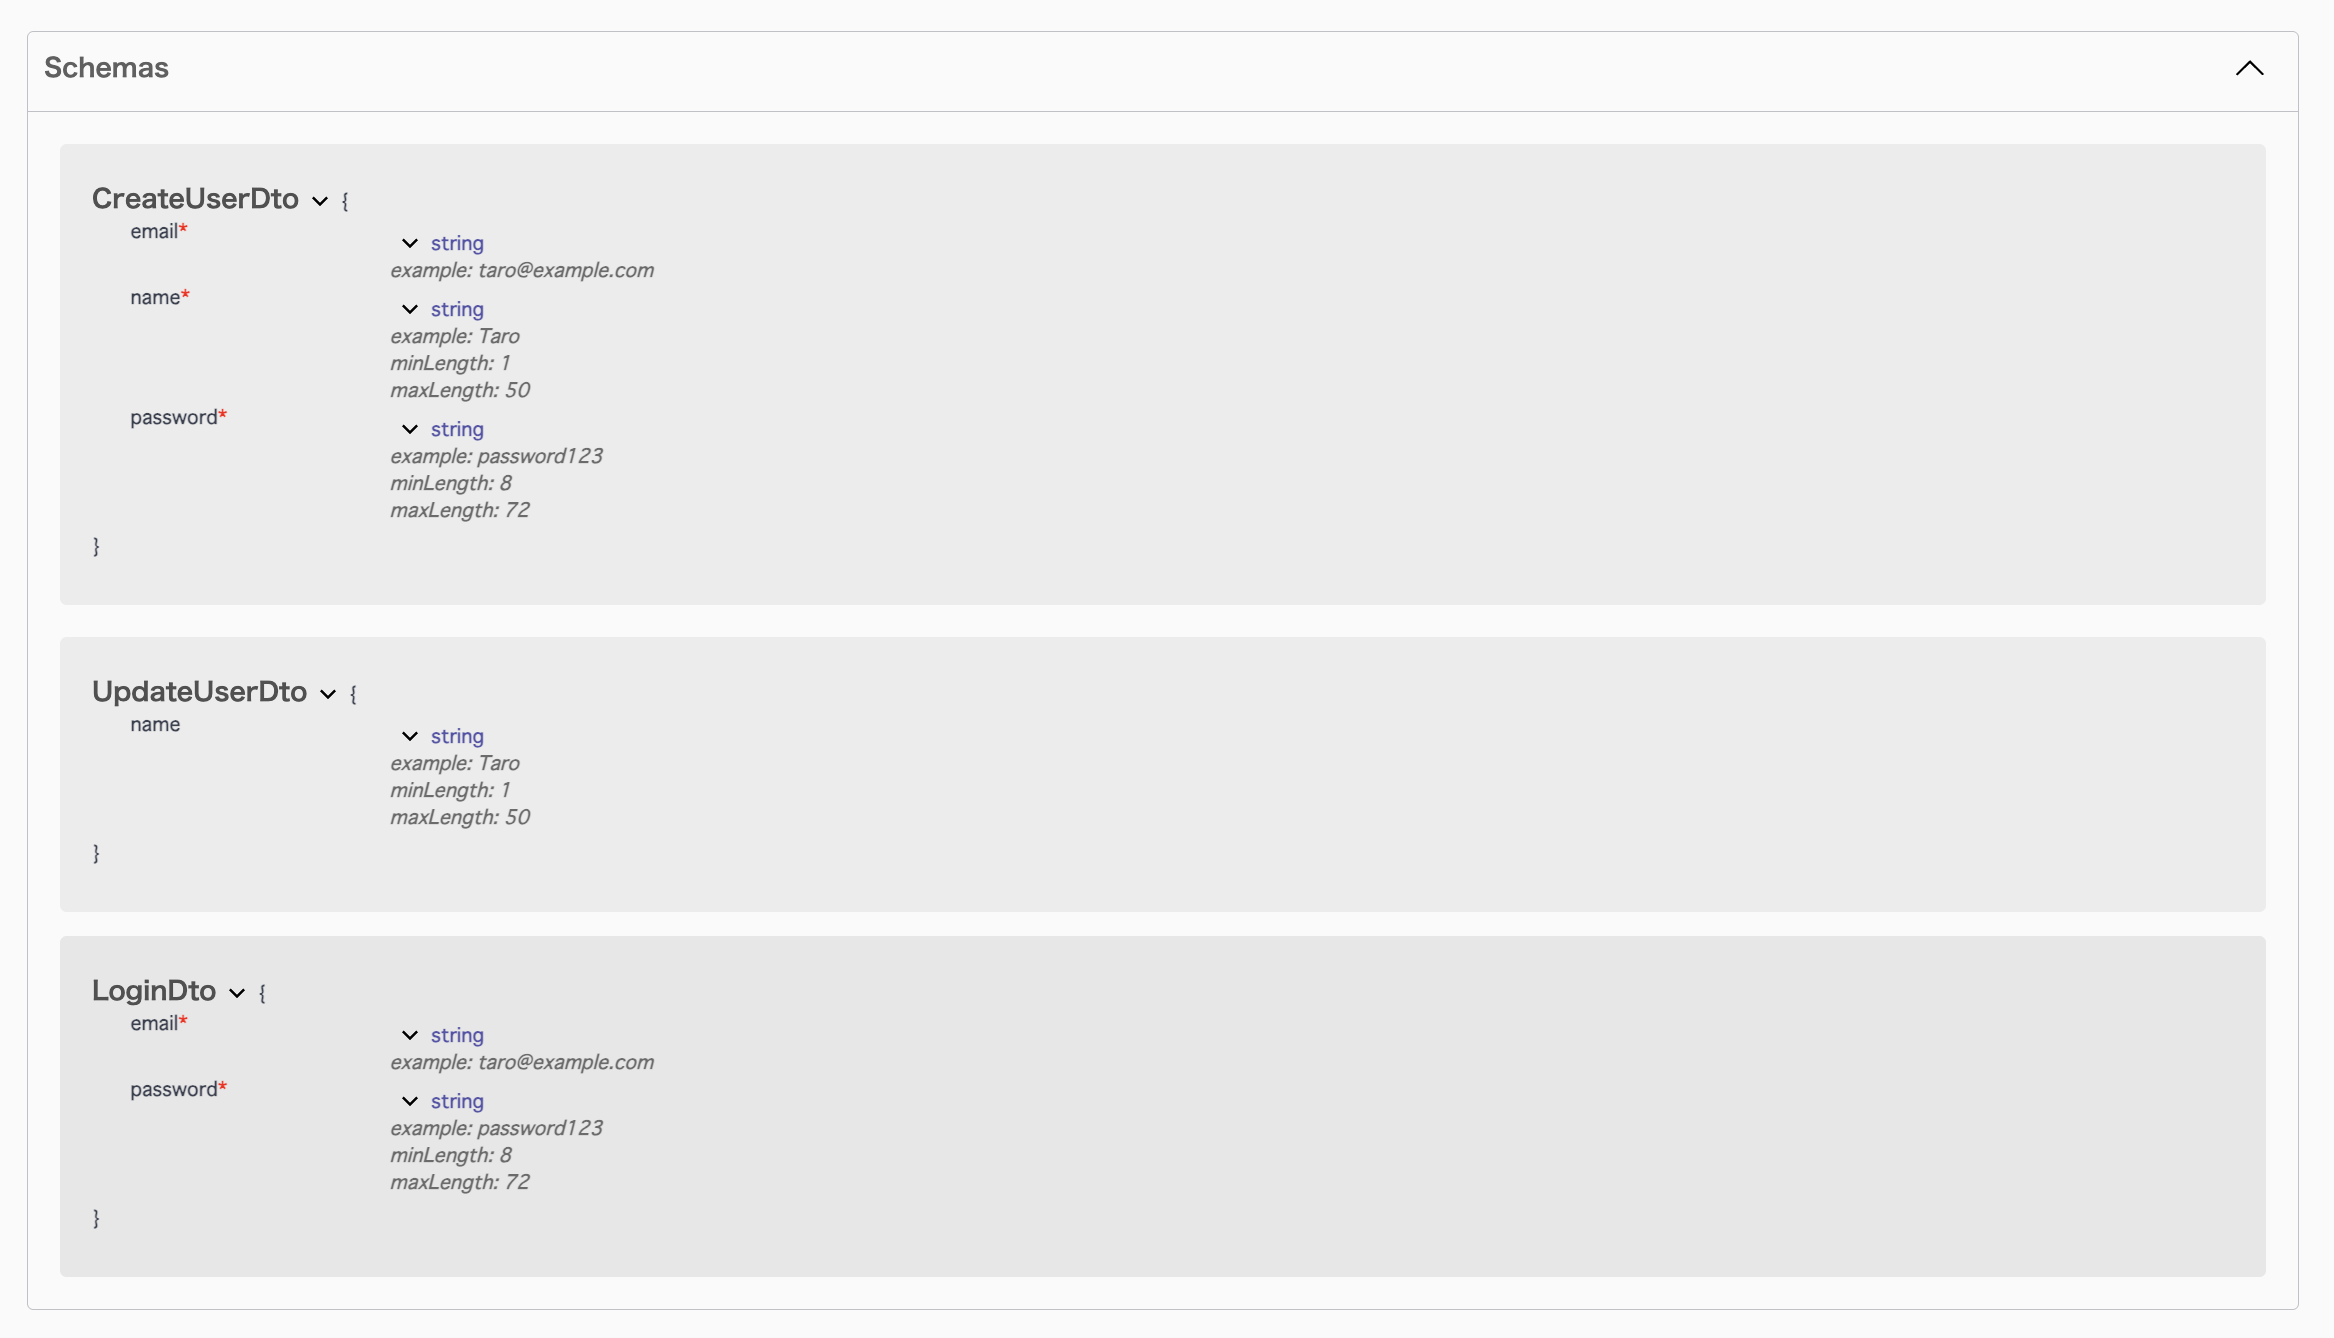
class-validator は実行時の検証、@ApiProperty はSwagger表示用と考えると分かりやすい。
4. UpdateUserDto にSwagger用の説明を追加する
編集するファイルは api-sample/src/users/dto/update-user.dto.ts。
import { ApiPropertyOptional } from "@nestjs/swagger"; // 追加
import { IsOptional, IsString, Length } from "class-validator";

export class UpdateUserDto {
  @ApiPropertyOptional({ example: "Taro", minLength: 1, maxLength: 50 }) // 追加
  @IsOptional()
  @IsString()
  @Length(1, 50)
  name?: string;
}
任意項目は ApiPropertyOptional を使う。
5. LoginDto にSwagger用の説明を追加する
編集するファイルは api-sample/src/auth/dto/login.dto.ts。
import { ApiProperty } from "@nestjs/swagger"; // 追加
import { IsEmail, IsString, Length } from "class-validator";

export class LoginDto {
  @ApiProperty({ example: "taro@example.com" }) // 追加
  @IsEmail()
  email!: string;

  @ApiProperty({ example: "password123", minLength: 8, maxLength: 72 }) // 追加
  @IsString()
  @Length(8, 72)
  password!: string;
}
6. AuthController にタグを付ける
編集するファイルは api-sample/src/auth/auth.controller.ts。
import { Body, Controller, Post } from "@nestjs/common";
import { ApiOperation, ApiTags } from "@nestjs/swagger"; // 追加
import { AuthService } from "./auth.service";
import { LoginDto } from "./dto/login.dto";

@ApiTags("auth") // 追加
@Controller("auth")
export class AuthController {
  constructor(private readonly authService: AuthService) {}

  @ApiOperation({ summary: "ログインしてJWTを取得する" }) // 追加
  @Post("login")
  login(@Body() dto: LoginDto) {
    return this.authService.login(dto);
  }
}
@ApiTags("auth") を付けると、Swagger UI上で認証系APIが auth グループにまとまる。
7. UsersController にタグとBearer設定を追加する
編集するファイルは api-sample/src/users/users.controller.ts。
import {
  Body,
  Controller,
  Delete,
  Get,
  Param,
  Patch,
  Post,
  Req,
  UseGuards,
} from "@nestjs/common";
import { ApiBearerAuth, ApiOperation, ApiTags } from "@nestjs/swagger"; // 追加
import { JwtAuthGuard } from "../auth/jwt-auth.guard";
import { CreateUserDto } from "./dto/create-user.dto";
import { UpdateUserDto } from "./dto/update-user.dto";
import { UsersService } from "./users.service";

@ApiTags("users") // 追加
@Controller("users")
export class UsersController {
  constructor(private readonly usersService: UsersService) {}

  @ApiBearerAuth() // 追加: Swagger UIのAuthorizeで入れたBearer tokenを使う
  @ApiOperation({ summary: "ログイン中のユーザー情報を取得する" }) // 追加
  @UseGuards(JwtAuthGuard)
  @Get("me")
  me(@Req() req: { user: { userId: string; email: string } }) {
    return req.user;
  }

  @ApiOperation({ summary: "ユーザー一覧を取得する" }) // 追加
  @Get()
  findAll() {
    return this.usersService.findAll();
  }

  @ApiOperation({ summary: "ユーザーを1件取得する" }) // 追加
  @Get(":id")
  findOne(@Param("id") id: string) {
    return this.usersService.findOne(id);
  }

  @ApiOperation({ summary: "ユーザーを作成する" }) // 追加
  @Post()
  create(@Body() dto: CreateUserDto) {
    return this.usersService.create(dto);
  }

  @ApiOperation({ summary: "ユーザーを更新する" }) // 追加
  @Patch(":id")
  update(@Param("id") id: string, @Body() dto: UpdateUserDto) {
    return this.usersService.update(id, dto);
  }

  @ApiOperation({ summary: "ユーザーを削除する" }) // 追加
  @Delete(":id")
  remove(@Param("id") id: string) {
    return this.usersService.remove(id);
  }
}
@ApiBearerAuth() は認証が必要なエンドポイントに付ける。全users APIを認証必須にする設計なら、Controllerクラス側にまとめて付けてもよい。
8. 動作確認
起動する。
pnpm run start:devブラウザで開く。
http://localhost:3000/api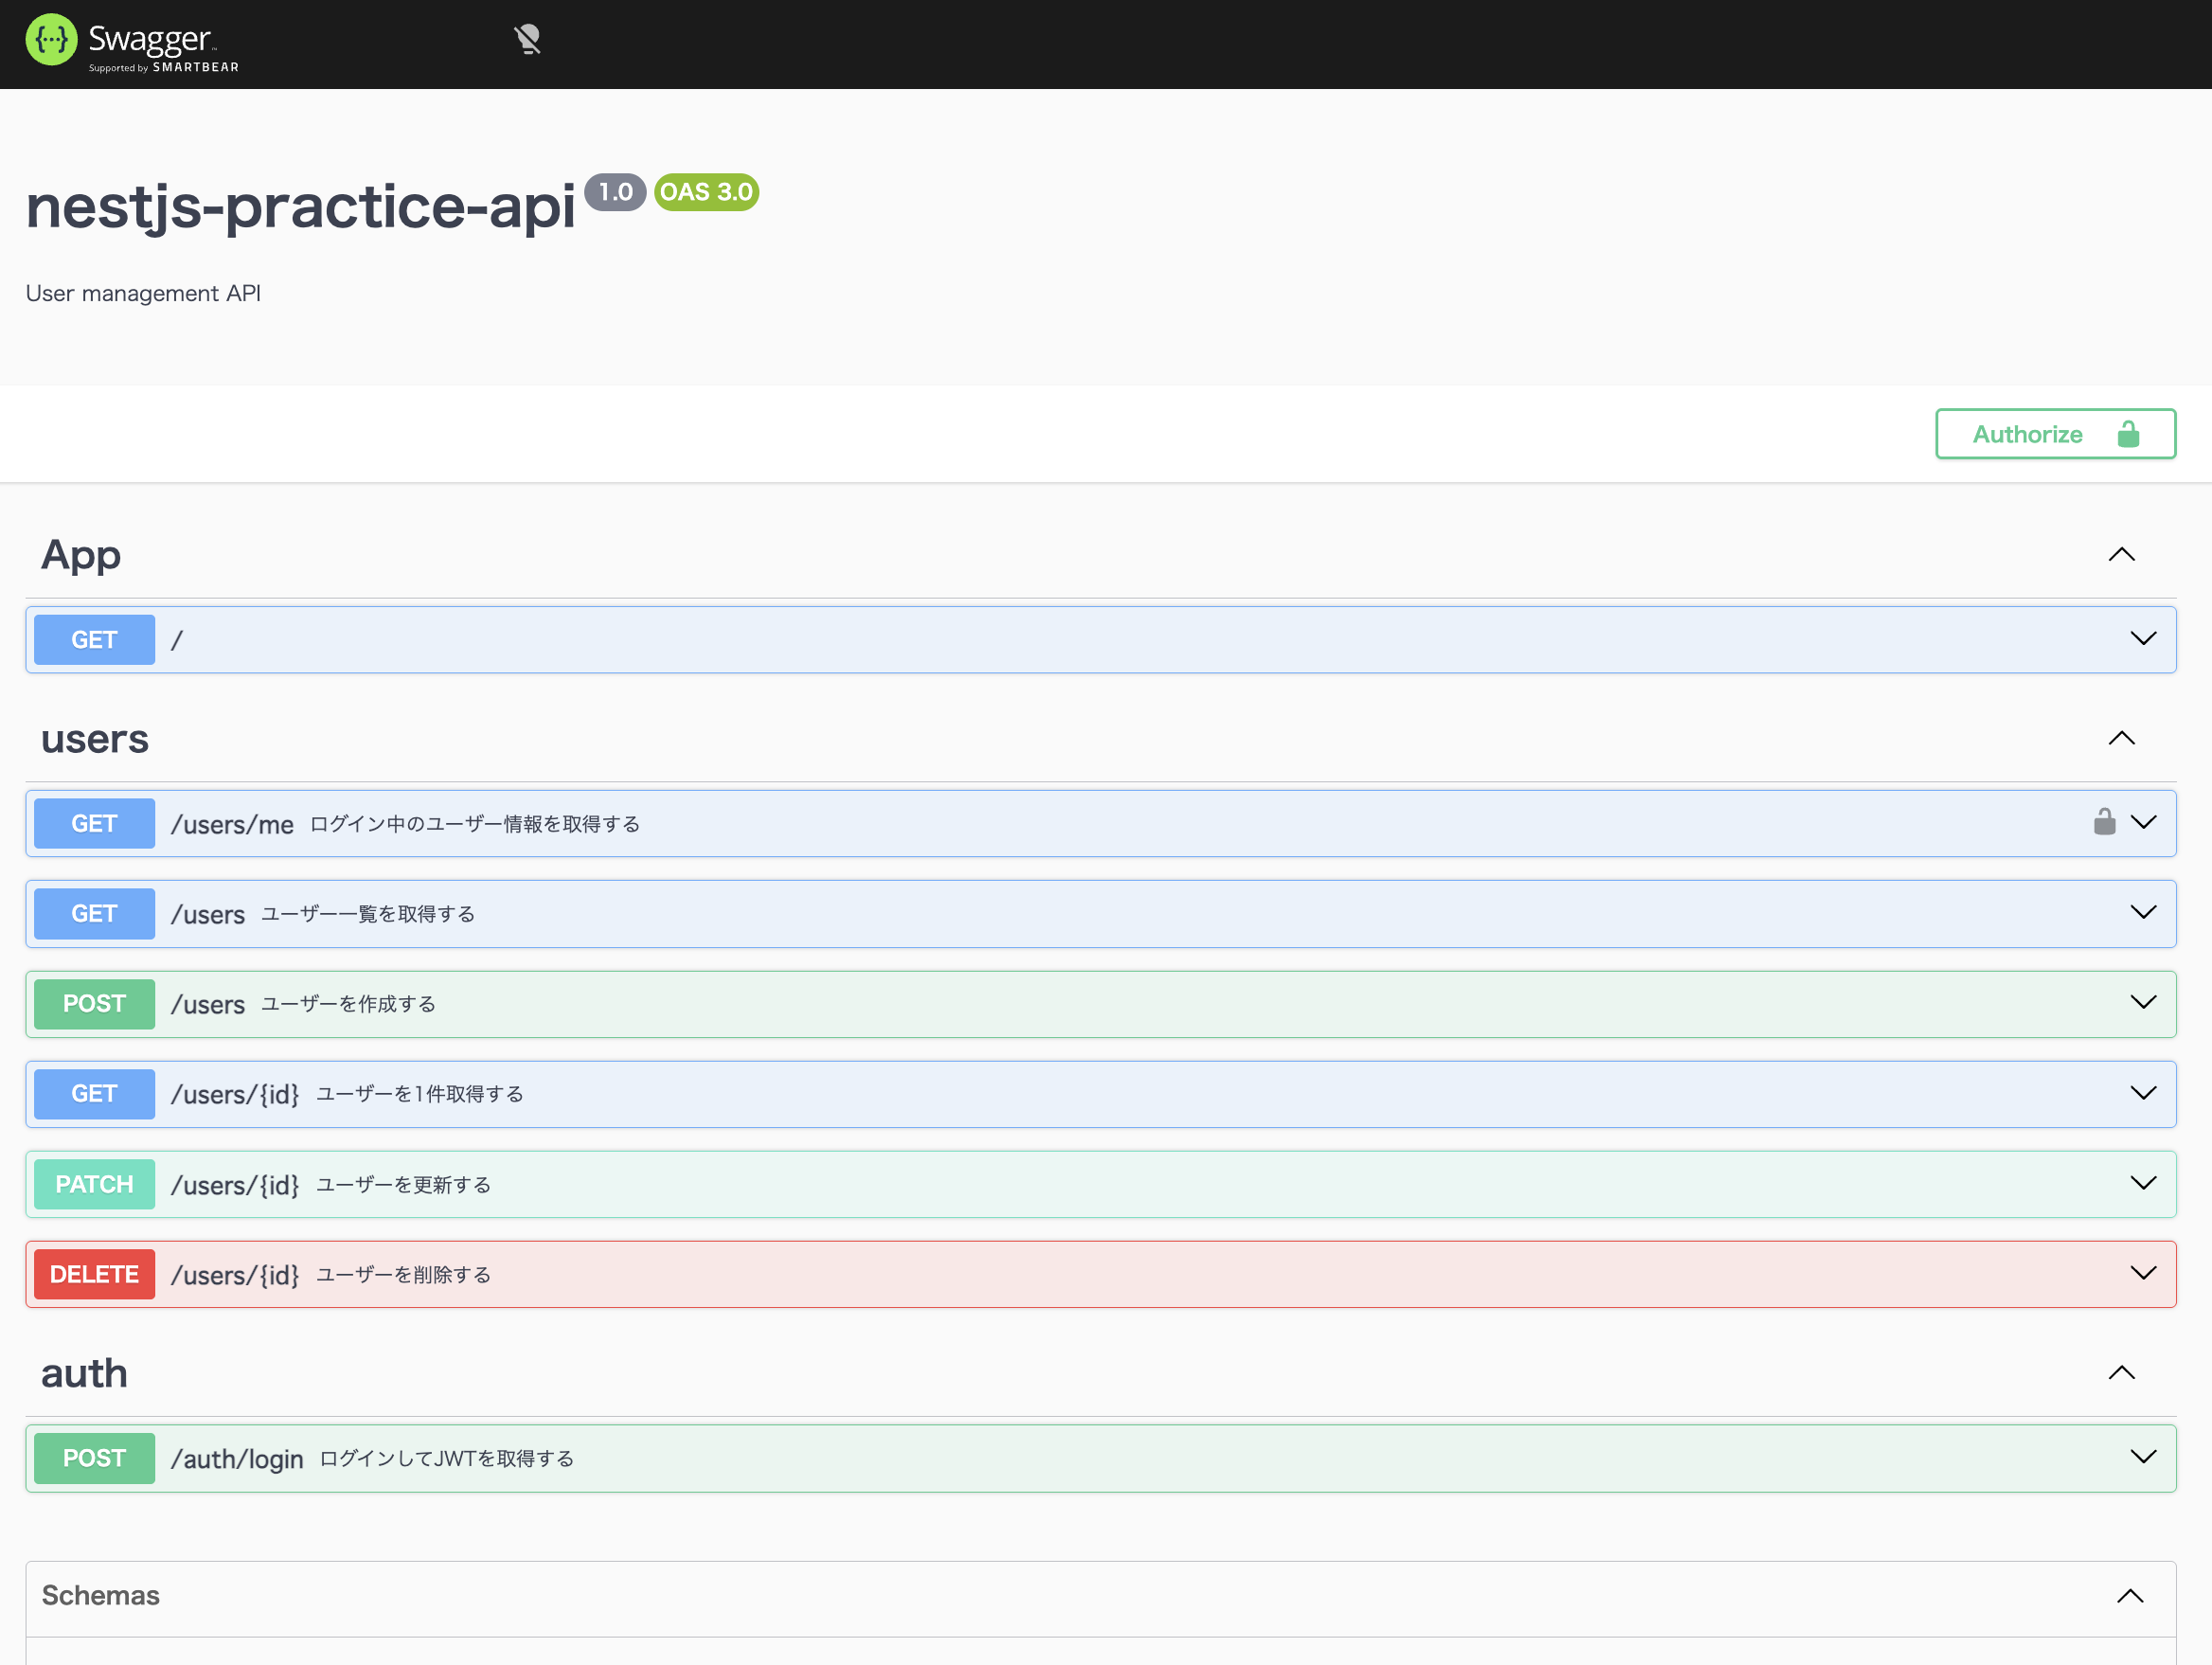
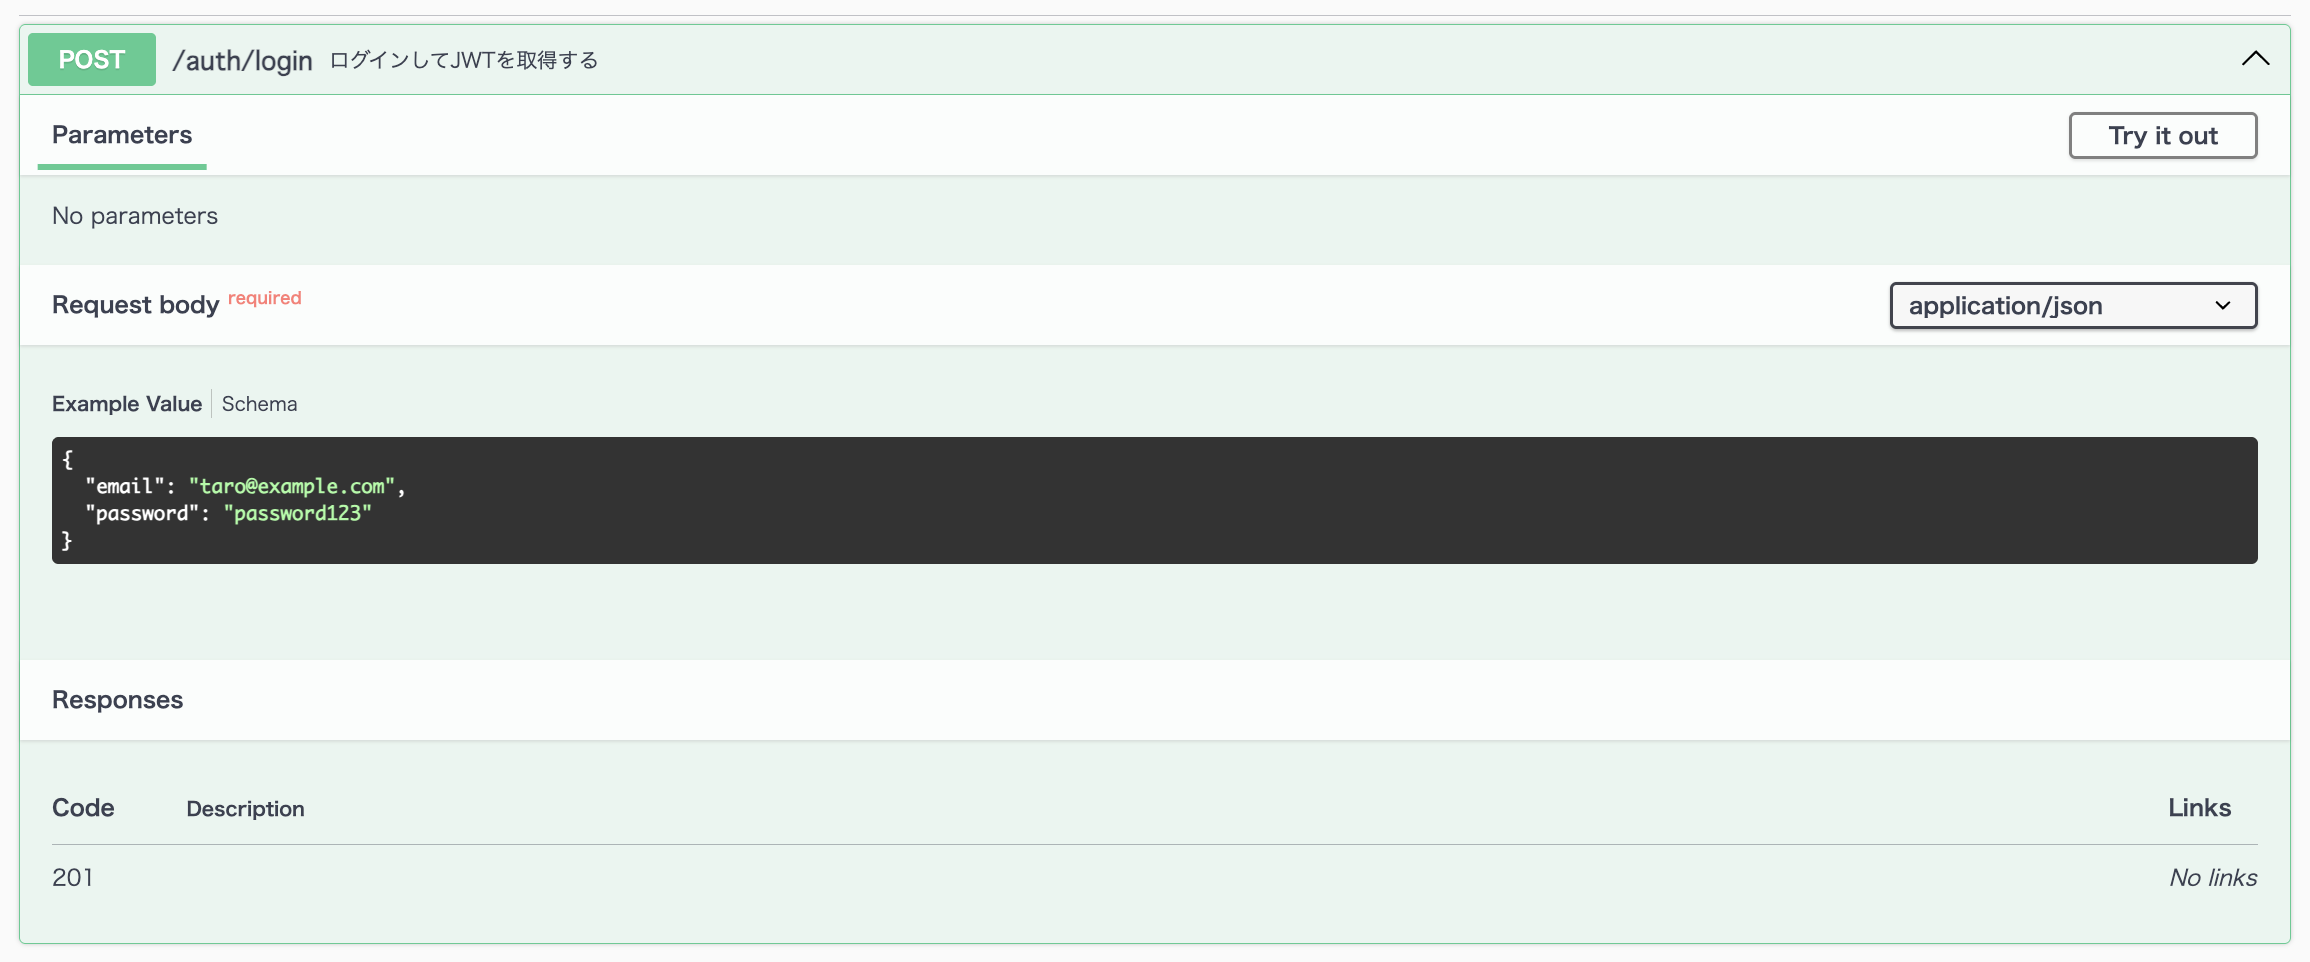
確認ポイント。
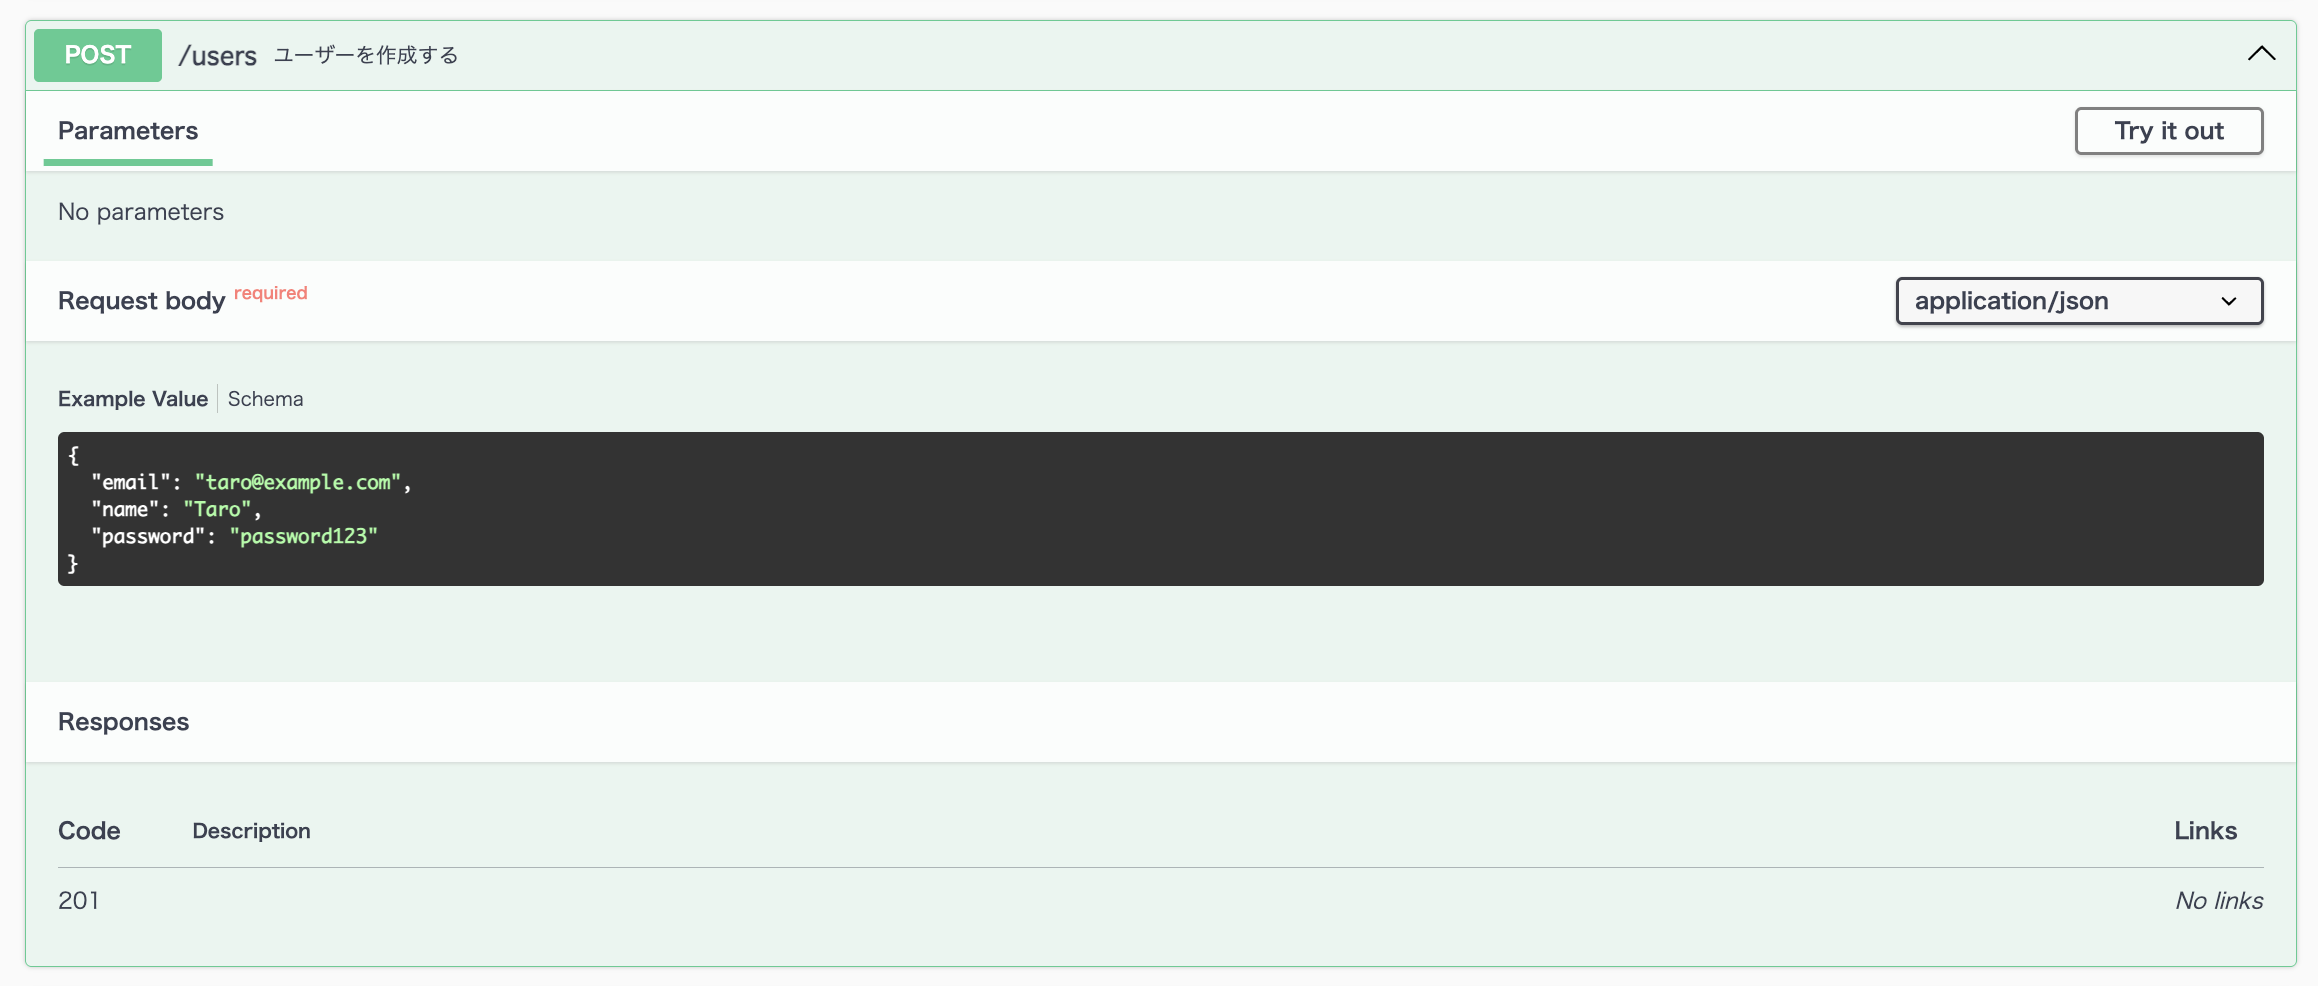
authとusersのグループが表示されるPOST /usersのBodyにemail/name/passwordが表示されるPOST /auth/loginのBodyにemail/passwordが表示されるGET /users/meに鍵マーク、またはBearer認証の表示がある
Swagger UIでJWT認証APIを試す
GET /users/me はJWTが必要なAPIなので、先にSwagger UI上でユーザー作成とログインを行い、ログインAPIのレスポンスから accessToken を取得する。
POST /usersを開く- Try it out を押す
- Request body に次のような値を入れる
{
  "email": "jiro@example.com",
  "name": "Jiro",
  "password": "password321"
}- Execute を押す
POST /auth/loginを開く- Try it out を押す
- Request body に次のような値を入れる
{
  "email": "jiro@example.com",
  "password": "password321"
}- Execute を押す
- Response body に返ってきた
accessTokenをコピーする
{
  "accessToken": "xxxxx.yyyyy.zzzzz"
}
次に、この accessToken をSwagger UIへ登録する。
- 画面右上の Authorize ボタンを押す
bearerなどの入力欄に、コピーしたaccessTokenを貼り付ける- Authorize を押す
- Close を押してダイアログを閉じる
Swagger UIの設定によっては、入力欄に Bearer を付けずにJWT本体だけ入れる。この記事の addBearerAuth() の設定では、まず xxxxx.yyyyy.zzzzz のようなJWT本体だけを入れればよい。
最後に認証必須APIを実行する。
GET /users/meを開く- Try it out を押す
- Execute を押す
- 200で次のようなレスポンスが返れば成功
{
  "userId": "cmxxxxxxxxxxxxxxxxxxxxx",
  "email": "jiro@example.com"
}もし401になる場合は、Authorizeに入れたtokenが間違っている、期限切れ、@ApiBearerAuth() が対象APIに付いていない、@UseGuards(JwtAuthGuard) 側の設定に問題がある、などを確認する。
実装タスク(チェックリスト)
-
main.tsにDocumentBuilder/SwaggerModule.setupを追加 -
CreateUserDto/UpdateUserDto/LoginDtoにSwagger annotationsを追加 -
AuthControllerに@ApiTags("auth") -
UsersControllerに@ApiTags("users")と必要な@ApiBearerAuth -
http://localhost:3000/apiでUI表示を確認 - Swagger UIから作成・ログイン・認証必須APIを確認
次のステップ
NestJSテスト入門で、Swaggerで触ったエンドポイントを自動検証に繋ぐ。